2008-06-25

illustration design : vektorika magazine free download !

illustration design : vektorika magazine free download !


vektorika magazine #10
CHARACTER DESIGN ISSUE
Download
Vektorika Magazine #10
(12 MB)


vektorika magazine #9 (Vector Graphic Design)
THE ASIANA ISSUE
Download Vektorika Magazine #9 (10.5 MB)


vektorika magazine #8
LOVE ISSUE
Download Vektorika Magazine #8 (9.7 MB)


vektorika magazine #7 (Vector Graphic Design)
ROCK N' ROLL ISSUE
Heavier than before.. lets rocks!!
Download Vektorika Magazine #7 (9.8MB)


vektorika magazine #6 (Vector Graphic Design)
BEAUTY ISSUE
Download Vektorika Magazine #6 (7.9MB)


vektorika magazine #5 (Vector Graphic Design)
TOYS + GAMES ISSUE
Download Vektorika Magazine #5 (3.6MB)


vektorika magazine #4 (Vector Graphic Design)
EROTIKA ISSUE
Download Vektorika Magazine #4 (3.5MB)


vektorika magazine #3 (Vector Graphic Design)
SUPERSTAR ISSUE
Download Vektorika Magazine #3 (3.6MB)


vektorika magazine #2 (Vector Graphic Design)
HELVETICA ISSUE
Download Vektorika Magazine #2 (1.6MB)


vektorika magazine #1 (Vector Graphic Design)
Download Vektorika Magazine #1 (1MB)

2008-06-21

photoshop design : Awesome Eyes in Photoshop

photoshop design : Awesome Eyes in Photoshop


design web - Free worldpress themes

design web - Free worldpress themes


Welcome to SkinPress, Please browse through the templates and download them for free. All templates are free
>>>> http://www.skinpress.com/


2008-06-20

design interior - colour

design interior - colour

Colour can drastically affect your mood, so it is important to always bear this in mind when embarking on interior design projects. I am sure you will already have a favourite colour or group of colours, so build these into your overall scheme. Using colours that you know lift your spirits will make your colour choice work for you.
There are no hard and fast rules about choosing colours. Create your own sense of harmony by creating your own colour spectrum. It really is not wise to go for a colour purely because it is in vogue at the moment - you will soon live to regret it!

Where to begin
Begin by considering the colour of all the elements in the room, not just the flat surfaces. It may well be that you already have many items of furniture, accessories or soft furnishings that you will have to incorporate into the scheme, so these will have to form the bones of your plan. If you are starting totally from scratch, then so much the better, you have a clean palette to start with!
When using a large expanse of colour, remember that it will always appear darker and stronger than you imagine from having seen just a small fabric swatch or colour sample. This is particularly true of paint colours or wallpapers.

TIP: Buy a small sample pot and paint a large section on a piece of scrap plasterboard or something similar. Move it around the room and look at it at different times of the day. You will be amazed at how different the colour will appear in natural and artificial light. The depth of colour will also vary depending on the surface to which is applied and the amount of light it receives. If in doubt, always go for a shade lighter.

If you want more than one paint colour on the walls, then its is best not to go for a contrast, stick with the same colour but in a different shade, making it lighter or darker. A slightly ‘muddy’ look in paint colours is particularly popular at the moment. Farrow & Ball, Sanderson and The Paint Library offer a really unusual and comprehensive selection.

TIP: A trick that many decorators use is to chose one colour and paint the ceiling in the lightest shade, the walls in the next shade darker, the dado darker still and the woodwork in the darkest shade using a flat oil based paint for the greatest effect.

Curtains, floor and wall coverings
If you choose a dark colour for your curtains and are thinking of placing them against a pale wall, you will need to be aware that they will make a very strong statement. I feel that it is far better to tone down the colour of the curtains or deepen the colour on the walls slightly to avoid too strong a contrast.
When looking for floor coverings, there are lots of different options to choose from. Sisal and its modern day derivatives will always be popular, although they do not give the comfort and luxurious feel of a woollen carpet. The colour continuity and harmony you get from using the same coloured carpet throughout the whole house is well worth considering but you would be well advised to choose a neutral tone that is easy to live with! It also allows for greater flexibility in choosing the individual colour schemes for each room.

TIP: If you decide on carpeting, request a large sample piece from your supplier rather than the 10 cms square usually provided by the manufacturer. The same rule applies with carpets as with fabric and paint, too strong a shade will be overpowering when seen ‘en mass’, so go a shade lighter.

TIP: If you are re-furbishing an entire room and have the luxury of starting from scratch, then leave the paint colour or wallpaper design until last. This tends to make the fundamental choices of fabric, floor covering and accessories a lot easier.

Pattern and colour in the textiles you use, or perhaps in one very special article like a piece of ceramic or a painting, could form the bones of the colour scheme with wall colour used to tone down the overall palette.

Strong colours
It is best to steer clear of strong colours on the walls in rooms that you use very frequently. Go for paler tones, creams, grey-greens, blue-greys and ivories. Hall and staircases however are often neglected in terms of interesting colour schemes, but they are important as they make a first impression on entering the house and they serve the purpose of linking individual rooms creating an overall feel to the house. As we spend little time in them, merely passing through, then they can take a stronger shade. Hallways and staircases always get a lot of traffic and can quickly become shabby if you have not thought long-term of how your floor and wall coverings are going to stand up to a lot of wear and tear.

TIP: If you would like to experiment with using dark colours on walls, you would be well advised to restrict their use to rooms that are only used after dark.

Dining rooms in particular, can benefit from a darker colour scheme. To have a formal dining room that is rarely used is a luxury today. How about turning your little used dining room into a dining room come library. If you have the room, you could fit in a small sofa or comfy armchair. Your darker colour scheme could well include dark green, navy blue and deep red, colours that we typically associate with libraries. Blue is usually accepted as a cold colour, but the rich, dark blue shown in the example at the top of the page has been teamed with cream and the resulting affect, used in a master bedroom, is anything but cold. The two-tone tasselled trimming and cord bring the two colours together.

This very traditional drawing room has dark oak furniture. The owner chose a variety of different textures and patterns on the fabrics and fitted a deep velvet pile woollen carpet to match. It is a room that is predominantly used in the evening, as it faces east and gets little natural sunlight, other than first thing in the morning. The lighting consists of central chandeliers, matching wall lights, a picture light over the fireplace and various table lamps.

Uplifting
TIP: A trick that many interior designers use is to insert one red article in a room, no matter how small to serve as a focal point.
However, beware of using red as the dominating colour in a room. It is a very strong, aggressive colour and therefore difficult to live with, but one small and imposing red object, be it a chair or a vase of flowers, can give the room an amazing ‘lift’.

The strong red in this lambrequin and cushion is best used in small quantities. In this case, the roman blind picks out the colour of the stripes in the main fabric. The row of double piping on the blind has been cut on the straight so that the stripes run in perfect lines down the lambrequin and across the roman blind.

Next steps
If you still feel totally at a loss when it comes to colour, then a trip to KA International might help, or alternatively, purchase their catalogue if you are unable to visit one of their stores. They have very wisely broken their range of fabrics, furnishings, trimmings and accessories into five definite colourways, blue, red, neutral, green and yellow, with a separate selection of fabrics for children. Study their ranges of fabrics paying particular attention to how they have co-ordinated their colours within each particular colour block. Using this as a basis, you will have a fair idea of which colours appeal to you most!

design interior - Design Tips

design interior - Design Tips

Here are a few simple design ideas that you may find useful. If you scan through a number of home interest magazines you will find these ideas used over and over again.
FlowersRather than mixing flowers in a vase, keep to one variety – a bunch of cream roses, a vase of yellow tulips. You will get more of a sense of structure.
TIP: Try to use an interesting container. It may be something that is not intended as a vase but is equally, if not more, effective.
If you are aiming for a minimalist look, then go for a single flower, real, dried or artificial, placed in a slim vase. The larger the flower and vase, the greater the visual impact. A large seedpod grouped with a few grasses or bamboo sticks will look stunning. If funds permit, try 3 of the same arrangement in a line on an occasional table or fireplace.
FruitA simple and most effective design trick is to put the same variety of fruit together, a glass dish of oranges, a plate of apricots, or a bowl of pears. It is often much more effective than mixing them all together.
MirrorsAdd an element of surprise and a touch of glamour. They can create an illusion of space in even the smallest of rooms.
TopiaryTopiary need not be confined to the garden. Just as topiary can add structure in a landscape, so it can in the home. An inexpensive way to achieve the same effect is to use ivy trained on specially made frames. The advantage with ivy is that it is very fast growing and will tolerate the warmer temperatures found within the home.

TIP: There are also many pieces of topiary available using artificial materials - a welcome change from the usual dried flower arrangement

2008-06-18

SEO Techniques : Increasing Relevant Backlinks Using Do Follow Forums

search engine optimization : Increasing Relevant Backlinks Using Do Follow Forums

Definition : A forum is the place of discussion on the topic. The topic is depend on the forum owner.These days the popular forums are related to webmaster, seo, programming, business, etc. The people join the forum to discuss the problem here and also get the best solution.The forums allow signature link. Most of them allow to add 3-4 signature links. The dofollow forums are useful to increase more relevant links and increase traffic. Getting links from relevant and High authority sites will definately help in getting good page rank and the link from relevant place increase the ranking in search engines.Here is the list of dofollow
forums :
http://www.sitepoint.com/forums
http://forums.digitalpoint.com
http://www.webmaster-talk.com
http://www.webmaster-forums.net
http://v7n.com/forums/
http://forums.seochat.com
http://www.seo-guy.com/forum/
http://talk.iwebtool.com
http://www.seoproject.com/forum/
http://forums.seoroundtable.com/
http://www.submit-express.com/bbs/
http://www.webtalkforums.com/
http://www.allcoolforum.com/

2008-06-17

re design : Lightmaker Agency

re design : Lightmaker Agency


Lightmaker is a professional services agency that has been creating award-winning interactive experiences the world over since 1997.
Our goal is to bring inspiration and innovation to every user. And we don’t use the words “inspiration” and “innovation” lightly. In today’s online marketing landscape, technological innovation is both obstacle and solution. Our strong foundation in creativity and our deep knowledge of technology drive our ability to provide distilled solutions.
We revolutionize how our clients engage with ideas and information on the internet. The revolution starts with User Centric Design (UCD). Creating user-friendly interfaces means designing systems that take account of all the quirks and qualities that make us human. With a deep understanding of user behavior, our design teams are able to make decisions that are based upon deep behavioral knowledge which anticipate a user's wants and needs. The result is intuitive interfaces that make online transactions easy and fulfilling. For your business, that translates to a positive brand experience and increased profitability.
We are obsessed with creating and delivering a globally consistent internet experience. Our locations span the UK, Europe, North America and Australasia, making us one of the most comprehensive internet design and technology companies in the world.
We embrace the latest accessibility guidelines and worldwide standards. From industry bodies such as the World Wide Web Consortium (W3C) we deliver solutions using latest and best technologies such as XHTML, CSS, XML, Adobe Flash, Adobe ColdFusion, Microsoft .NET, Microsoft WPF and Microsoft Silverlight.
We work with the world’s leading organizations in a range of markets, which give us a unique insight and ability to combine knowledge from different sectors. Names like Adobe, Microsoft, IBM, EDS, Electronic Arts, PlayStation, Sony Entertainment, Sony Pictures, NHS Blood and Transfusion, IKEA, JK Rowling, David Beckham, Robbie Williams, BBC, ITV, Warner, Orlando Magic and Manchester United are just a few of our ongoing clients.

search engine optimization

search engine optimization

Search engine optimization (SEO) is the process of improving the volume and quality of traffic to a web site from search engines via "natural" ("organic" or "algorithmic") search results for targeted keywords. Usually, the earlier a site is presented in the search results or the higher it "ranks", the more searchers will visit that site. SEO can also target different kinds of search, including image search, local search, and industry-specific vertical search engines.
As a marketing strategy for increasing a site's relevance, SEO considers how search algorithms work and what people search for. SEO efforts may involve a site's coding, presentation, and structure, as well as fixing problems that could prevent search engine indexing programs from fully spidering a site. Another class of techniques, known as black hat SEO or spamdexing, use methods such as link farms and keyword stuffing that tend to harm search engine user experience. Search engines look for sites that employ these techniques and may remove them from their indices.
The initialism "SEO" can also refer to "search engine optimizers", terms adopted by an industry of consultants who carry out optimization projects on behalf of clients, and by employees who perform SEO services in-house. Search engine optimizers may offer SEO as a stand-alone service or as a part of a broader marketing campaign. Because effective SEO may require changes to the HTML source code of a site, SEO tactics may be incorporated into web site development and design. The term "search engine friendly" may be used to describe web site designs, menus, content management systems, URLs, and shopping carts that are easy to optimize.

design interior - Bedroom Design

design interior - Bedroom Design

For something such as a bedroom design you'll want to think long and hard about exactly what it is that you're going to do. Sure you know that you want to redecorate your bedroom but before you do anything too drastic you should decide what type of redesigning you want to do. Remember that it doesn't need to be anything spectacular or unusual because in the end you will have live with it, and unless you're willing to redo your new bedroom design and change it altogether.

In which case you can play around and find out exactly what you like at your leisure and not worry about whether the furnishings you bought would suit. But a lot of people won't be able to do that and they will need to resort to doing it the old fashioned way, or of course you have another option, and that's to resort to the use of home decorating software.

If you don't want to go that route either you always have the option of doing it the old fashioned way. With this method you might not get as much visualization as with the others but you can still achieve great results. The problem here is that sometimes it's very difficult to see what the end result of your bedroom design will be like.

The best way to start is to get a pencil and a piece of paper and to mark out very roughly what your room shape is. If you have trouble visualizing it then move into the bedroom and see what results you get. Next you should mark out the most obvious aspects of the existing bedroom design which will be unchangeable, like doors and windows.

After that it's a hop, skip and a jump to go on to the next step which is to play around on paper where you would like the heavier furnishings to go. And if you want to keep them where they are that's also fine because your bedroom design should be one that you're going to be happy with.

Then ideally you should settle on a color scheme. It doesn't need to be the same as the one in your existing bedroom design, it might be nice if you can change the whole thing around and turn the whole room on its head. After you settle on a color scheme there is only way to go and that is forward.

Start buying the new furnishings and fittings you'll need to fit in with your new bedroom design and just put it into place. And since you have everything you need to change around in your old bedroom design, you can take your time and rearrange everything at your leisure. See what fits best where and whether you need to add a little something extra. Now, it's just a matter of settling in and taking a good look at the bedroom design that you did, and enjoying the new furnishings and new fittings.

SVA Motion Graphics Portfolio 2007

SVA Motion Graphics Portfolio 2007

The 2007 portfolio reel of the Motion Graphics Dept headed by Jeffrey Metzner at the School of Visual Arts in New York City. Stude The 2007 portfolio reel of the Motion Graphics Dept headed by Jeffrey Metzner at the School of Visual Arts in New York City. Students featured: Mario Ardizzone, Jesse Benjamin, Michelle Bitner, Leland Chang, Nora Hurley, Je Cheol Kim, Jesse Lampkin Hang Yeol Lyu, Donnie Miller, Heather Monetti, Lauren Moreau, Aaron Nichols, Joseph Perno, Danny Renda, Jie Yun Roe, Paul Sahner, Kelly Shultz and Louis Viana.


Motion Graphics Showreel 2007 By Stephen Watkins

Motion Graphics Showreel 2007 By Stephen Watkins

Stephen Watkins. 2007 motion graphics showreel. A mix of uni, personal and commercial work.Music: 'La' by Old Man River


SKETCH DESIGN : HAND SKETCHING TUTORIAL pt2

SKETCH DESIGN : HAND SKETCHING TUTORIAL pt2


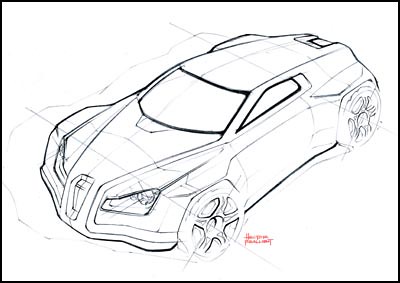
5: FOCAL POINT (Line Weight: medium and heavy)


It’s very important to have a focal point – even on line drawings. In this case, the focal point is the corner of the car closest to the observer, or closest headlight. This area will begin with thick line weight that tapers as it flows away from the focal area. This also includes thicker line weight around the headlights (h). This is also a good time to indicate tire tread and black out grilles, spokes, and vents.


6: HATCHING (Line Weight: light)
Hatching is a quick way to indicate lighting. The hatch line should have uniform line weight. Sometimes it is best to hatch in the opposite direction when indicating a surface corner (i).


7: SHADING (line Weight: various)
When shading, try to shade in the same direction as the initial hatch lines.Don’t forget to vignette, or shade in a direction which starts dark and fades lighter as the shade moves away from the focal area (J).Again, the focal point should have the most contrast, line weight, and detail.


8: SHADOW (Line Weight: various)
Since the shadow is not really a part of the car, I chose to hatch in a completely different direction than the hatching/shading on the car in order to separate the shadow. The darkest part of the shadow is the area directly below the car, then, as it projects away from the car, the shadow should get lighter and more transparent (vignette).

From http://www.designertechniques.com/

2008-06-15

Photoshop CS3 Tutorial: Advanced Selecting Hair

Photoshop CS3 Tutorial: Advanced Selecting Hair

In this video we will cover using channels to cleanly cut out complex hair selections of both brunette and blonde hair on a studio style background and an outdoor scene. You will learn a lot about how to select things in Photoshop using the techniques displayed in this video which will aid you in selecting many different things, not just hair.


flash resouce : ActionScript 3.0 Communicating with Buttons & Linking-Flash

flash resouce : ActionScript 3.0 Communicating with Buttons & Linking-Flash

In this video we will learn how to communicate with and use buttons in Flash CS3 using Actionscript 3.0. There have been some significant changes to the way flash deals with buttons etc... but this video will solve your problems! We will cover editing a symbol's alpha, navigating a time line, and linking to a URL or Website on the web via your flash button.

Photoshop design - Learn the Basics of Curves

Photoshop design - Learn the Basics of Curves

Learn the basics of Curves in no time!


from http://www.tutvid.com

SKETCH DESIGN : HAND SKETCHING TUTORIAL pt1

SKETCH DESIGN : HAND SKETCHING TUTORIAL pt1


1: INITIAL SKETCH AND OVERLAY (Line Weight: light)
After choosing a final design, I check the perspective by reversing the page and looking through it using a lamp. I use axle lines in order to make sure that my wheels are within perspective (a). The minor axis should be perpendicular to the major (or axle line) axis (b).In order to check surfaces, I draw contour lines (c and d) along the X and Y axis while going over every surface change. Just like the wheels, notice the axis lines along the headlights in order to make sure that the ellipses for the headlights are correct (e).


2: PERIMITER LINE WEIGHT (Line Weight: heavy)
The perimeter line weight will probably be the thickest to help pull the image off the page and emphasize the overall silhouette– it should be darkest towards the undercarriage.


3: SURFACE SEPARATION (Line Weight: medium)
The third step is to separate all major surface changes, such as the hood, cowl, grilles, vents, and separation lines. NOTE: Most surface breaks on vehicles are rounded or have some sort radius. To visually emphasize this; instead of using a single line (which indicate a sharp, acute surface break), two parallel lines should be used to indicate a radius on the edge (f).


4: GLASS DETAILS (Line Weight: heavy)
A rather heavy line weight is used around the glass area to indicate seals, material separation as well as emphasis on the DLO (Day-Light-Opening). (g)

From http://www.designertechniques.com/

3D - CG Irrational Fear of Scary Japanese School Girls

3D - CG Irrational Fear of Scary Japanese School Girls


from http://ichiriduka.hp.infoseek.co.jp/

Create a Windows Vista Icon all Vector! Illustrator Tutorial

Create a Windows Vista Icon all Vector! Illustrator Tutorial

In this video we will go from the very start of the process to the very end of the process of duplicating the "my computer" icon for Windows Vista and making it all vector! If you like tracing and vectorizing or if you are new to the whole thing you will certainly enjoy learning all kinds of techniques right here right now! Watch, Learn, Enjoy!

design web - Pageear - free peel away ad


They create a new banner area for websites without effecting the current banner areas and easy to implement. On the other hand, pagepeel banners have a relatively high "click per view ratio".

- Download Pageear files.- Unzip the filed in a folder.- Create to images with sizes 100×100 and 500×500. 100×100 sized image is the one which will be shown when Pageear is closed and 500×500 will be shown when user mouse overs the Pageear banner. You can pageear_b.jpg ve pageear_s.jpg files as an example. BTW, .GIF and .PNG are not supported.- Open the Pageear.js file wit a text editor and update the paths to the .JPG and .SWF files depending on your setup.- Include Pageear.js and AC_OETags.js in to the webpages where Pageear banner will be displayed (example below).- Place the writeObjects() javascript function under your body tag.- That’s all.
Pageear can also be implemented easily with the ready to use Wordpress plugin, Joomla module or Typo3 extension (download links below).

Website: http://www.webpicasso.de/blog/kostenloses-pagepeel/
Download: http://www.webpicasso.de/blog/wp-content/plugins/DownloadCounter/download.php?id=11
Joomla Module: http://www.webpicasso.de/blog/joomla-pagepeel-pageear-ad-ons/
Typo3 Extension: http://www.webpicasso.de/blog/joomla-pagepeel-pageear-ad-ons/
Tags: Banner Extension Pageear Pagepeel Plugin
Filed under: Banner, Goodies, Open Soft. License

2008-06-14

Glossy Photoshop Web 2.0 Badge for Web Design

Glossy Photoshop Web 2.0 Badge for Web Design

The 3D badges are everywhere! Yes, it is the latest trend on those Web 2.0 web designs. These are the star-shaped labels that you see stuck on web pages, alerting you to something important.
Here we start with creating the shape of the badge. Select the Polygonal Tool under your tool bar. Then do some setting for ythe polygonal shape so it will be a star shape. Set the sides to 15 and the options to star shape and the indent sides by 20%


Then start with drawing the shape of your badge. Remember to set your path option to either filled pixels or path, while here filled pixels are being used.


Now we need to add in some nice radial gradient to make it look 3D. Let’s try some nice bright green #aeff00 and a darker green for the shadow #77ae00. Before that remember to lock the layer of your star badge and select the radial gradient. Now pull the gradient from top right to bottom. Just like below.


Now to make it stand out, we need to add in some effects on it. Double click the layer that have the star shape, and the Layer Style will pop up, just add in the effects accordingly. You can see the difference below, after adding the effects


You are almost there to complete your web2.0 3D badge. Now we need to add some highlight to the badge. Use the pen tool and draw a shape like below. The go to your path palette, hold on to the ALT key and click on the path layer, it will make a selection of the path you just drawn, then filled it with white. The duplicate the highlight layer and add a gradient overlay to the layer. After that set the layer opacity to 60%.
Now make a selection of your star shape layer, and go to Select > Modify > Contract, set 2px and then go back to your highlight layer and click Select > Inverse and press delete. It will delete the unused highlight outside the star shape. You will get something like the 3D badge below.


Now to complete your 3D web 2.0 Badge, add in the message you wanna shout for. Let’s add “newly added” with a nice bold fonts to it. I uses the common fonts here, you can use any fonts of your preference. The setting og the fonts are below, just set accordinly if you like it this way. Then for the final touch up, double click the text layer and add in the layer style. After that click Edit > Transform > Rotate, and give it a -25 degrees to it. And Voila! You are done and enjoy adding the 3D web Badge to your web template now.


From boxedart.com